Monday, 10 February 2020

Registering the Application

Step 8: Registering the Application

When developing with React for the browser, we just need to define a mount point, call React.render, and let React do its magic. In React Native, this is a little bit different.
import React from ‘react';
import {View, Text, StyleSheet, TouchableOpacity, Alert, Platform} from ‘react-native';

class HelloThere extends React.Component {
  clickMe() {
    Alert.alert(Platform.select({
      ios: ‘Welcome to iOS!',
      android: ‘Welcome to Android!'
    }));
  }

  render() {
    return (
      <View style={styles.container}>
        <TouchableOpacity onPress={this.clickMe.bind(this)}>
          <View style={styles.box}>
            <Text style={styles.message}>Hello {this.props.name}. Please click me.</Text>
          </View>
        </TouchableOpacity>
      </View>
    );
  }
}

var styles = StyleSheet.create({
  container: {
    flex: 1,
    justifyContent: 'flex-start',
    alignItems: 'center'
  },
  box: {
    borderColor: 'red',
    backgroundColor: '#fff',
    borderWidth: 1,
    padding: 10,
    width: 100,
    height: 100
  },
  message: {
    fontFamily: 'myCustomFont'
  }
});

var MainComponent = function() {
  this.render = function() {
    return <HelloThere name="Component" />;
  }
};

AppRegistry.registerComponent('MainComponent', function() {
  return MainComponent;
});
We have to register the component for the Objective-C side of things, which is done using the AppRegistry object. The name we give has to match with the name inside the Xcode project.
Our Hello World React Native application has significantly more lines of code than its web counterpart, but on the other hand, React Native takes separation of concerns a bit further, especially because styles are defined with the component.
As a side note, we shouldn’t rebind the clickMe method to the this context in the render method, especially if our React (Native) application grows to be a bit more complex. It rebinds the method on every render call which can become quite a lot. The alternative is to bind the method inside the constructor.

Running the Application

To run the application, we need to replace the contents of the index.ios.js file with the piece of code of our transformed application from the last step. Then we just need to open the Xcode project and press the big Run button. First, a terminal will open with the React Native server, and then the simulator window will appear. The React Native server creates a bundle, which the native application will then fetch. This allows for a web development-like rapid development cycle, where changes will be reflected almost instantly in the simulator.
For Android, it’s enough to add the following to your package.json file, under scripts:
"android-linux": "react-native bundle --platform android --dev false --entry-file index.ios.js --bundle-output android/app/src/main/assets/index.android.bundle --assets-dest android/app/src/
main/res && react-native run-android"
And then run npm run android-linux. Make sure the android/app/src/main/assets directory exists beforehand.
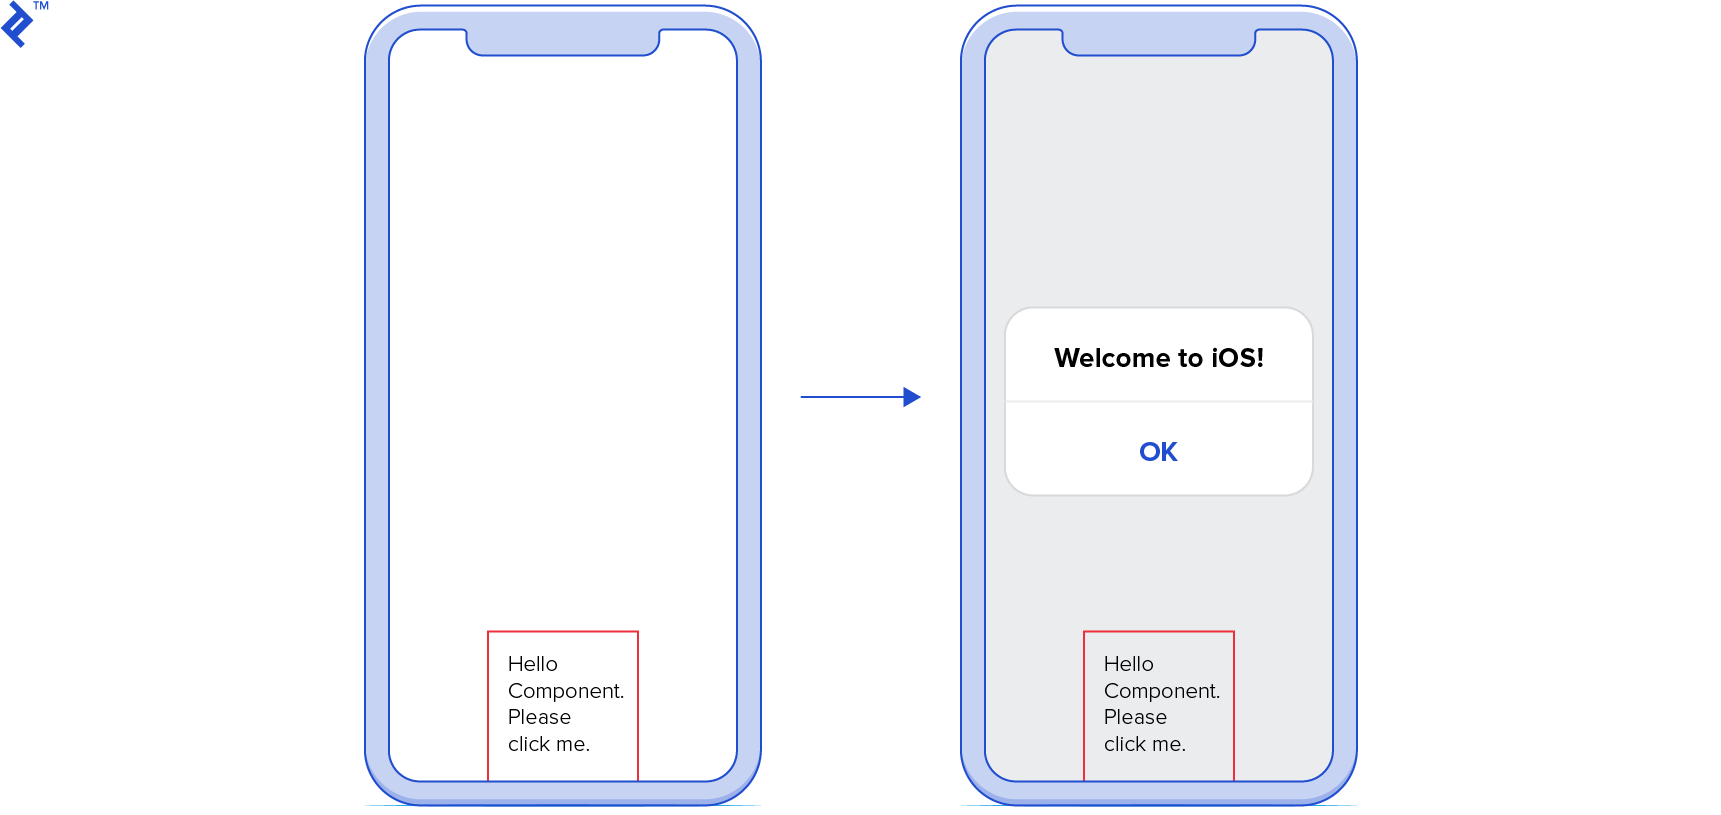
After the terminal has popped up, our application will then show up in the simulator. Pressing CMD+D will show a development menu. Clicking on the box will then show an alert. The iOS version:
An Apple phone with an alert popup saying "Hi."
And Android renders something like this:
An Android phone with an alert popup saying "Hi."
For distribution, having an application that points to a local development server would not be working out for us. For this reason, we can create the bundle for usage when the React Native server isn’t running with the command react-native bundle. In that case, we need to update the didFinishLaunchingWithOptions method of AppDelegate to use the offline bundle.
This example application is also available on Github.

Working with React Native

Another thing worth mentioning is that we not only use React concepts and JavaScript for our mobile applications, but some of workflows web developers are used to are also available with React Native. When coming from web development, we are used to developer tools, inspecting elements, and live reloading.
The way React Native works is that it puts all of our JavaScript files in a bundle. This bundle is either served from a server or bundled together with the application. The first is incredibly useful for development in the Simulator, as we can enable live reloading. The developer menu React provides is by no means as mighty as the Chrome Developer Tools, but it provides a very web-like developer experience with live reloading and debugging with the Chrome (or Safari) developer/debugger tools.
Web developers are familiar with JSFiddle or JSBin, an online playground for quick web tests. There is a similar environment that allows us to try out React Native in a web browser.

React Native: A Solid, Modern Choice

I had originally suggested a more cautious approach to React Native. Today, it’s a mature and solid choice.
One of the big advantages with React is that it doesn’t impose on your workflow, since it just represents the view layer. Do you want to define your own Grunt pipeline? Or would you rather use Webpack? And will you use Backbone.js for your model needs? Or do you want go with plain JavaScript objects? Answers to all of these questions are totally up to you, because React does not put any restriction on these choices. As the official site had put it: “Since React makes no assumptions about the rest of your technology stack, it’s easy to try it out on a small feature in an existing project.”
To a certain degree, this is true for React Native as well. Mobile developers can integrate React Native as a part of their application, take advantage of the web-inspired development workflow, and choose to integrate the library on a larger scale if needs be.
In any case, one thing is certain: React Native isn’t going away. Facebook has a massive stake in it having multiple React Native-powered applications in app stores. The community around React Native is huge and continues to grow.

Customize Behavior Across Platforms

Step 5: Customize Behavior Across Platforms

It is possible to detect which platform the React Native application is running on, by accessing the value of Platform.OS. Let’s say that, in the example above, we wanted to display a different alert message based on the platform we are running on. We can do it like this:
...
clickMe() {
  var message = ‘';
  if(Platform.OS == ‘ios') {
    message = ‘Welcome to iOS!';
  } else if(Platform.OS == ‘android') {
    message = ‘Welcome to Android!';
  }   
  Alert.alert(message);
}
...
Alternatively, the select method is also available, which provides a switch-like syntax:
…
clickMe() {
  Alert.alert(Platform.select({
    ios: ‘Welcome to iOS!',
    android: ‘Welcome to Android!'
  })
  );
}
...
In order to add a custom font, we need to jump through some hoops. First of all, make sure that the font full name and the font’s file name are the same: iOS will use the font’s full name in order to pick the font up, while Android uses the file name.
So, if your font’s full name is myCustomFont, make sure the font’s file name is myCustomFont.ttf.
After that, we need to create an assets folder and point npm to it. We can do it by creating the folder first, under assets/fonts in the application’s root directory. Any other directory will do, but this is the conventional name used for the fonts directory.
We can tell npm where we have our assets by adding an Assets property under React’s npm integration section, rnpm:
"rnpm": {
  "Assets": [
    "./assets/fonts/"
  ]
}
After we’ve done all that, we can finally run react-native link. That will copy the fonts to the right directories and will add the necessary xml to info.plist on iOS.
Once done, we can use our font by just referencing it in any stylesheet by its full name. Let’s use it on our Text element:
import React from ‘react';
import {View, Text, StyleSheet, TouchableOpacity, Alert} from ‘react-native';

class HelloThere extends React.Component {
  clickMe() {
    Alert.alert("Hi!")
  }
  render() {
    return (
      <TouchableOpacity onPress={this.clickMe()}>
        <View style={styles.box}>
          <Text style={styles.message}>Hello {this.props.name}. Please click me.</Text>
        </View>
      </TouchableOpacity>
    );
  }
}

var styles = StyleSheet.create({
  box: {
    borderColor: 'red',
    backgroundColor: '#fff',
    borderWidth: 1,
    padding: 10,
    width: 100,
    height: 100
  },
  message: {
    fontFamily: 'myCustomFont'
  }
});

React.render(<HelloThere name="Component" />, document.getElementById('content'));

Step 7: Moving Things Around

React Native uses the same rules as Flexbox for laying out components. Say we wanted to position our button at the bottom of the screen: let’s wrap our TouchableOpacity with a container View:
<View style={styles.container}>
    <TouchableOpacity onPress={this.clickMe.bind(this)}>
        <View style={styles.box}>
            <Text style={styles.message}>Hello {this.props.name}. Please click me.</Text>
        </View>
    </TouchableOpacity>
</View>
And now let’s define the container style, together with the other already defined styles:
container: {
    flex: 1,
    justifyContent: 'center',
    alignItems: 'center'
  }
Let’s focus on justifyContent and alignItems. Those two properties control how the component is aligned respectively along its primary axis and its secondary axis. By default, the primary axis is the vertical one, and the secondary axis is the horizontal axis (you can change that by setting the flexDirection property to row).
justifyContent has six possible values it can be set to:
  • flex-start will position all the elements together, at the beginning of the component’s bounding box.
  • flex-end will position all the elements at the end.
  • center will position all the elements in the center of the bounding box.
  • space-around will spread the components evenly, and will center the components in their created bounding boxes.
  • space-evenly will spread the components evenly as well, but it will try to leave an equal amount of space between the components and the other boundaries.
  • space-between will spread the components by keeping the spacing between adjacent components equal.
alignItems can be set to four possible values: flex-startflex-endcenter, and stretch. The first three behave like they do for justifyContent, while stretch will set the component to occupy all the available space along the axis, so that the axis will be completely filled.
So, since we want our TouchableOpacity to be displayed at the bottom and centered along the horizontal axis, we can change the style like so:
container: {
  flex: 1,
  justifyContent: 'flex-end',
  alignItems: 'center'
}
More information about the values justifyContent and alignItems we will discuss in the coming sections


Getting Started with this React Native Tutorial


There are certain prerequisites that beginners will need to set up in order to develop for React Native. Since iOS was the first platform supported, and the one we’re covering in this tutorial, we need macOS and Xcode, at least version 6.3. Node.js is also needed. What helps is installing Watchman through the Brew package manager with brew install watchman. While this is not necessarily needed, it helps when dealing with a lot of files inside our React Native project

To install React Native, we simply need to install the React Native command-line application with npm install -g react-native-cli. Calling the react-native command then helps us create a new React Native application. Running react-native init HelloWorld creates a folder called HelloWorld in which the boilerplate code can be found.

Transforming a React Application

With React being the key feature and the core principles coming from the React library, let’s take a look at what we need to transform a minimal React “Hello World” application into a React Native one.
We use some ES2015 features in this code example, specifically classes. It is completely feasible to stick with React.createClass or use a function form similar to the popular module pattern.
var React = require('react');

class HelloThere extends React.Component {
  clickMe() {
    alert('Hi!');
  }
  render() {
    return (
      <div className="box" onClick={this.clickMe.bind(this)}>Hello {this.props.name}. Please click me.</div>
    );
  }
}

React.render(<HelloThere name="Component" />, document.getElementById('content'));

Step 1: Embrace CommonJS Modules

In the first step we need to change requiring the React module to use react-native instead.
var React = require('react-native');

class HelloThere extends React.Component {
  clickMe() {
    alert('Hi!');
  }
  render() {
    return (
      <div className="box" onClick={this.clickMe.bind(this)}>Hello {this.props.name}. Please click me.</div>
    );
  }
}

React.render(<HelloThere name="Component" />, document.getElementById('content'));
What is usually a part of the tooling pipeline when developing a React web application is an integral part of React Native.

Step 2: There Is No DOM

Not surprisingly, there is no DOM on mobile. Where we previously used <div />, we need to use <View /> and where we used <span />, the component we need here is <Text />.
import React from ‘react';
import {View, Text, Alert} from ‘react-native';

class HelloThere extends React.Component {
  clickMe() {
    Alert.alert(‘hi!');
  }
  render() {
    return (
      <View className="box" onClick={this.clickMe.bind(this)}>Hello {this.props.name}. Please click me.</View>
    );
  }
}

React.render(<HelloThere name="Component" />, document.getElementById('content'));
While it’s quite convenient to put text directly in <div /> elements, in the native world text can’t be put directly in a <View />. For that we need to insert a <Text /> component.
import React from ‘react';
import {View, Text, Alert} from ‘react-native';

class HelloThere extends React.Component {
  clickMe() {
    Alert.alert(‘hi!');
  }
  render() {
    return (
      <View className="box" onClick={this.clickMe.bind(this)}>
        <Text>Hello {this.props.name}. Please click me.</Text>
      </View>
    );
  }
}

React.render(<HelloThere name="Component" />, document.getElementById('content'));

Step 3: Inline Styles Are the Way to Go

React Native allows us to use the Flexbox modeling instead of messing around with float and inline-block that we are so familiar with in the web world. The interesting thing is that React Native does not use CSS.
import React from ‘react';
import {View, Text, StyleSheet, Alert} from ‘react-native';

class HelloThere extends React.Component {
  clickMe() {
    Alert.alert(‘hi!');
  }
  render() {
    return (
      <View style={styles.box} onClick={this.clickMe.bind(this)}>
        <Text>Hello {this.props.name}. Please click me.</Text>
      </View>
    );
  }
}

var styles = StyleSheet.create({
  box: {
    borderColor: 'red',
    backgroundColor: '#fff',
    borderWidth: 1,
    padding: 10,
    width: 100,
    height: 100
  }
});

React.render(<HelloThere name="Component" />, document.getElementById('content'));

Using inline styles seems bewildering to beginners. It is similar to the transition React developers had to go through when being confronted with JSX and previously using templating engines like Handlebars or Jade.
The idea is that we don’t have stylesheets globally in the way we use CSS. We declare the stylesheets directly at component level, and so we have all the information we need to see what our component does, the layout it creates, and the styles it applies.
import React from ‘react';
import {Text} from ‘react-native';

var Headline = function(props) {
  this.render = () => <Text style={headlineStyle.text}>{props.caption}</Text>;
};

var headlineStyles = StyleSheet.create({
  text: {
    fontSize: 32,
    fontWeight: 'bold'
  }
});

module.exports = Headline;

Step 4: Handling Events

The equivalent to clicking in web pages is tapping an element on the mobile device. Let’s change our code so that the “alert” pops up when we tap the element.
import React from ‘react';
import {View, Text, StyleSheet, TouchableOpacity, Alert} from ‘react-native';

class HelloThere extends React.Component {
  clickMe() {
    Alert.alert("Hi!")
  }
  render() {
    return (
      <TouchableOpacity onPress={this.clickMe()}>
        <View style={styles.box}>
          <Text>Hello {this.props.name}. Please click me.</Text>
        </View>
      </TouchableOpacity>
    );
  }
}

var styles = StyleSheet.create({
  box: {
    borderColor: 'red',
    backgroundColor: '#fff',
    borderWidth: 1,
    padding: 10,
    width: 100,
    height: 100
  }
});

React.render(<HelloThere name="Component" />, document.getElementById('content'));


Instead of events being directly available on <View /> components, we need to explicitly use elements that trigger events, in our case a touch event when pressing the view. There are different types of touchable components available, each of them providing a different visual feedback.